

PyWPS Quickstart
PyWPS is an OGC WPS (Web Processing Service 1.0.0) server implementation written in Python.
The PyWPS 4.0.0 library is installed by default on OSGeo-Live. This is a core library that is not intended to be executed directly, but rather to be used in the development of WPS services. An example service based on Flask is available at GitHub to facilitate a first contact with PyWPS.
This Quickstart describes how to:
Install and configure the pywps-flask example service
Perform
GetCapabilities,DescribeProcessandExecuterequestsDevelop your own WPS processes
Installing pywps-flask
Since the example service depends on Flask, make sure it is installed on your OSGeo-Live:
sudo apt install python-flask
Then clone the repository from GitHub:
git clone https://github.com/geopython/pywps-flask.git
Now move into the repository folder and edit the configuration file. This can be done with a program like nano:
nano pywps.cfg
The only critical thing to verify is the location of logging database. Pywps-flask provides a sample SQLite database that can be used for this purpose. Make sure the database setting reads like:
database=sqlite:////home/user/pywps-flask/logs/pywps-logs.sqlite3
Save the configuration file and exit nano you can now run the service:
python demo.py
If all goes well you will receive back a message like:
* Running on http://127.0.0.1:5000/ (Press CTRL+C to quit)
Testing available processes
Open a web browser and point it to the address where the example service is listening: http://127.0.0.1:5000/ You will be presented with the following page:
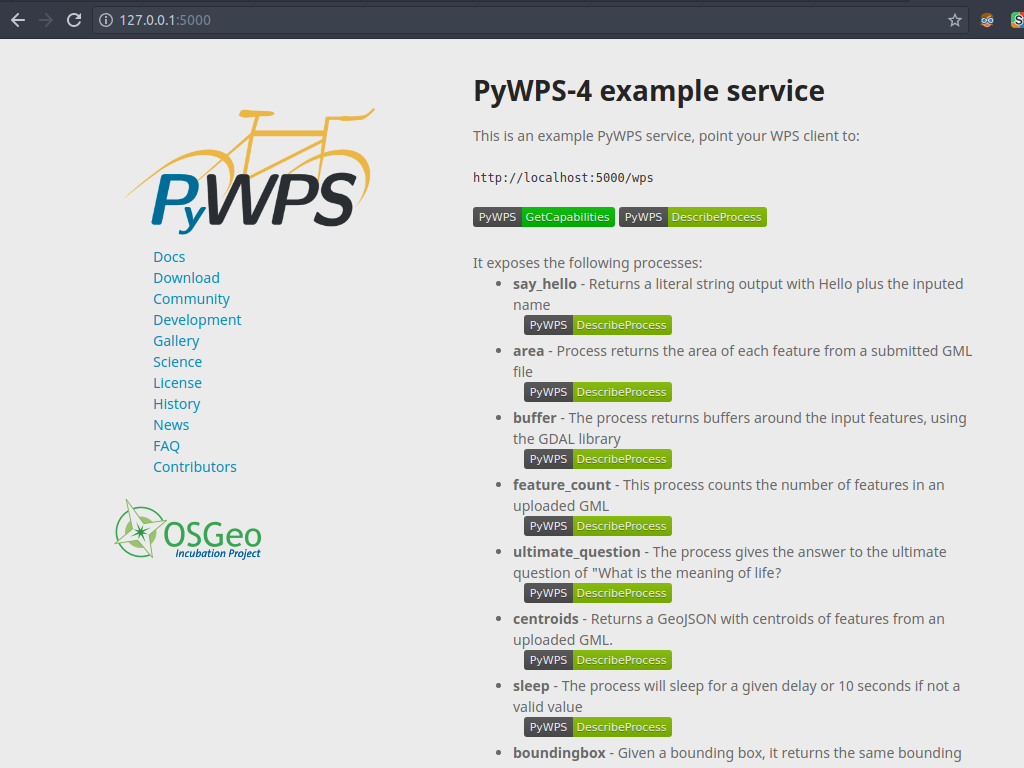
Use the green buttons to explore the service. Issue a GetCapabilities request for an overview of the service; issue a DescribeProcess request to learn the details of a particular project. Note the request URL in the browser address.
It is now time to test an Execute request. You can try the say_hello process, which is fairly simple. Direct your web browser to the following address:
http://localhost:5000/wps?service=WPS&version=1.0.0&request=Execute&identifier=say_hello&dataInputs=name=OSGeo-Live
The process simply replies back with a “Hello OSGeo” message, encoded in a standard WPS response document. Your browser should be showing something like:

Developing WPS processes
To develop new processes all you need to do is create new Python modules inside the processes folder. Use the existing processes as templates to help you structure your code. A closer look at the say_hello process shows the main feature of a PyWPS process:
1. Import the necessary assets and create a class inheriting from the PyWPS Process class. In the constructor create the necessary objects for inputs and outputs:
from pywps import Process, LiteralInput, LiteralOutput, UOM

class SayHello(Process):
    def __init__(self):
        inputs = [LiteralInput('name', 'Input name', data_type='string')]
        outputs = [LiteralOutput('response',
                                 'Output response', data_type='string')]
Invoke the parent constructor, passing on the metadata of the process:
super(SayHello, self).__init__(
    self._handler,
    identifier='say_hello',
    title='Process Say Hello',
    abstract='Returns a literal string output\
     with Hello plus the inputed name',
    version='1.3.3.7',
    inputs=inputs,
    outputs=outputs,
    store_supported=True,
    status_supported=True
)
3. Create the handler method, that will be invoked to handle Execute requests. Use the request and response objects to retrieve inputs and set outputs.
def _handler(self, request, response):
    response.outputs['response'].data = 'Hello ' + \
        request.inputs['name'][0].data
    response.outputs['response'].uom = UOM('unity')
    return response
What’s next
PyWPS gives you the freedom and flexibility to write your own Python processes and expose them accordingly.
Official documentation - For further information on PyWPS configuration and the API, consult the documentation on the PyWPS website.
Tutorial - Try out the workshop, a tutorial used in workshops to introduce new users to PyWPS 4.
Deployment to production - The pywps-flask service is just an example and not designed for production. One possible alternative is a Django based service, pywps-django. The documentation provides further details on how to set up a production service with Apache or nginx and Gunicorn.